
ledlight
Cutting, Connecting, and Powering LED Strip Lights: A Comprehensive Guide
LED strip lights are versatile and widely used in various products. However, when working with LED strips, it is essential to know how to cut and connect them to meet customer and internal requirements. Whether it’s for different voltages, various LED strip styles, or customized cutting methods, having a simple guide can greatly improve your operations.Cutting LED Strips
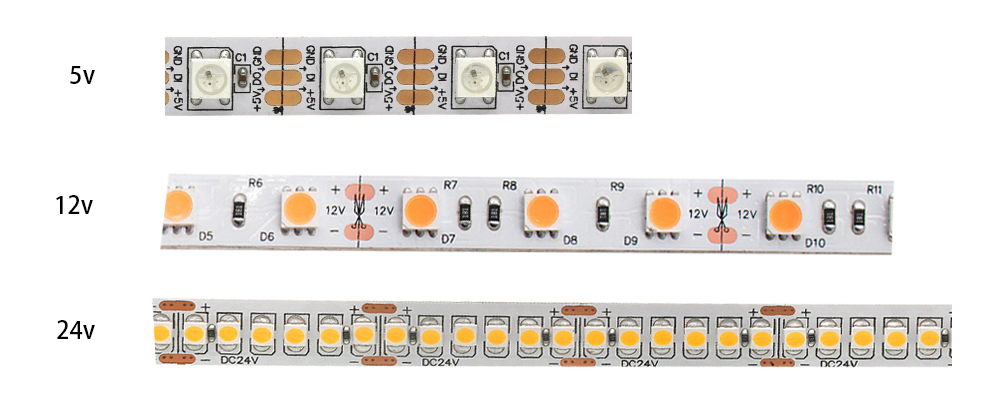
By Voltage:
LED light strips are typically divided into segments based on voltage: 5V, 12V, and 24V. Here’s how they are cut:- 5V: Cut a single set using a scissors mouth.
- 12V: Cut a group of three lights using a scissors mouth.
- 24V: Cut a group of six lights using a scissors mouth.
Please note that cutting COB LED strips can be a bit more challenging due to the high-density of chips on the PCB. To determine the position for cutting COB strips, refer to the image below:

By Type:
LED strips come in various types, including:- SMD LED Strip
- COB LED Strip
- Addressable LED Strip
- Neon LED Strip
Neon LED Strips, on the other hand, have a thick silicone coating, making it necessary to locate the scissors position from the cutting window. It may not be as obvious as the other LED strips, but you can refer to the clipping window shown below for guidance:
If you’re using a waterproof LED Strip, remember to scrape off the glue at the position of the pad that will be welded after cutting. Then, solder it after removing the material from the pad.
The welding method for Neon LED Strips is different from other bedroom led strip lights. After cutting it at a suitable position, solder the joints of the light strip, solder the wires, add a plug, and apply a little bit of solder to the plug. Glue can also help increase water resistance. For a detailed explanation of the specific steps, you can watch the YouTube video provided in the link below.
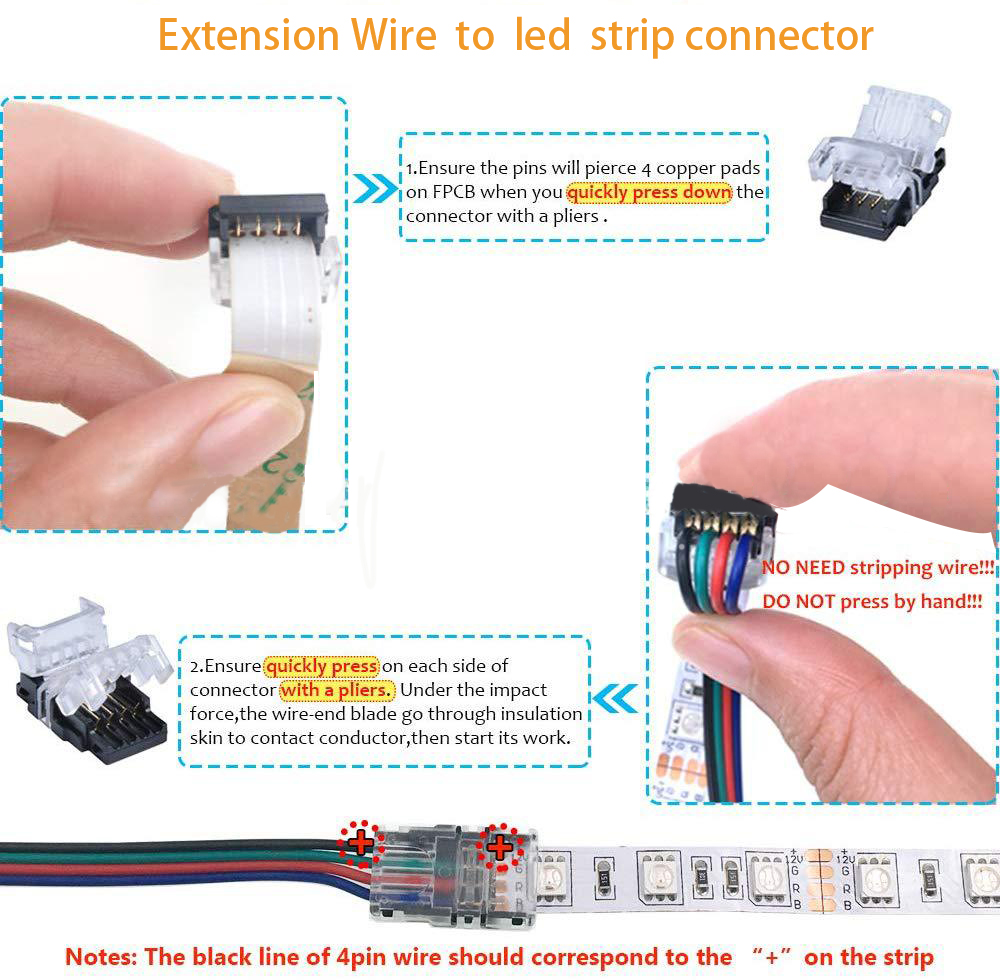
Solder-Free Connections (Connector Connections):
When it comes to connecting LED strip lights, solder-free connections provide an easier alternative. No need for a soldering iron! The most commonly used connectors are demonstrated in the YouTube video below:There are three types of connectors you can use:
- Weld-free Connector
- Transparent Connector
- Buckle
1 – How to use the Weld-free connector:
- Cut the light strip to a suitable position.
- Peel off about a ¼ inch of the 3M adhesive tape.
- Insert the two ends of the light strip into the middle top position and snap them together.
- Cover the connector.
- Power on to test.
Advantages & Disadvantages of Press-Fit Linkers:
The Weld-free connector is a traditional connector that allows for easy power-on effect after cutting. It is exceptionally convenient to use. However, there are a few disadvantages to consider:- This connection is only suitable for non-waterproof strips.
- It may cover one or two lamp beads when covered, causing dark areas on the strips.
- The connection may become loose after long-term use due to inadequate external tension.
2 – How to use the buckle:
- Cut the strip to a suitable position.
- Peel off about a ¼ inch of the 3M adhesive tape.
- Peel off the glue at both ends to expose the PCB board.
- Insert the best LED light strips at both ends into the middle top position and fasten them together.
- Press the lid.
- Power on to test.
Advantages & Disadvantages of the Buckle:
The buckle is suitable for waterproof strips, but its relatively large size may prevent it from fitting into smaller slots when using aluminum slots. This can cause some light blocking.Read more: Cutting, Connecting, and Powering LED Strip Lights: A Comprehensive Guide
3 – How to use the new transparent connector:
This latest connection method is suitable for 2PIN conventional light strips.- Cut the light strip to the proper position.
- Peel off about a ¼ inch of the 3M adhesive tape.
- Insert the light strips at both ends into the middle top position.
- Insert the pins to penetrate the PCB board.
- Power on to test.

Advantages & Disadvantages of transparent connectors:
The advantage of using transparent connectors is that they have two snaps that can easily penetrate the PCB board, ensuring a secure connection. Additionally, the transparent casing does not block any light. However, please note that these connectors are not suitable for 4PIN, 3PIN, RGB, RGBW light strips – they are only for monochrome light strips.Different Types of Transparent Connectors:
We offer different widths for these connectors, including 6mm, 8mm, and 10mm. Additionally, the board can be connected with one end or in the middle with a wire.By following this comprehensive guide, you can confidently cut, connect, and power LED strip lights for your projects. Enjoy the creativity and versatility brought by these amazing lighting solutions!
Read more: How Long Do LED Light Remote Batteries Last?
- Cumpleaños
- 2 Feb 1989 (Edad: 36)
- Ubicación
- Florida